Making Tinkerer's Workshop
The inspiration for this project came from a family job I started when I was around ten years old - auctions. This wasn't a huge operation, it really was just my extended family and some of their friends going to people's houses or barns and selling things. Going to work an auction held a small bit of magic in the air - the morning dew evaporating as the sun starts to rise, lines of cardboard boxes and plastic milk crates, tables filled with items of another lifetime with small groups of people floating about. One of the items that will stay in my memory forever is a small wire display stand advertising chocolate bars for five cents. It looked something like this but in worse condition.
I originally planned the workshop to be an amalgamation of the houses I've seen at auctions and turning it into a workspace for an older gentleman.

Update 1/4/2021:
To help me get a feel for what I wanted I made a mood board. I knew immediately wanted something along the lines of an unfinished basement and a long workbench. Here's a link to the mood board.
I also started the basics of blocking out the scene and a list of items I wanted in the scene.


Update 1/6/2021:
I needed to get more of the blocking in, so I focused a little more on the bench on the left. The hard part is making sure the desk looks full but not so full that it's cluttered.


Update 1/11/2021:
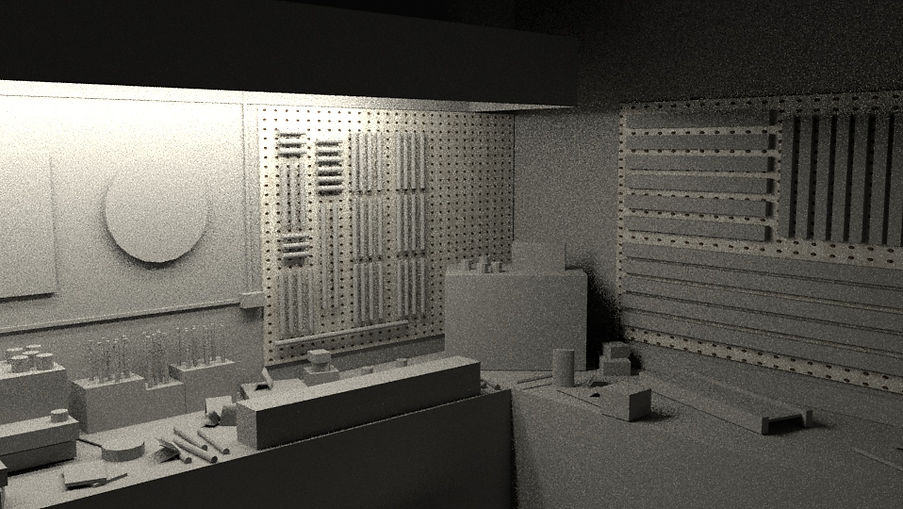
I for the most part finished the blocking of the objects on the desk, more specifically the table on the left and some pegboards. I don't know if I want to keep what is currently on the walls though. Overall, there is still a little more I want to add to the desks but that will come with getting real models in the scene.

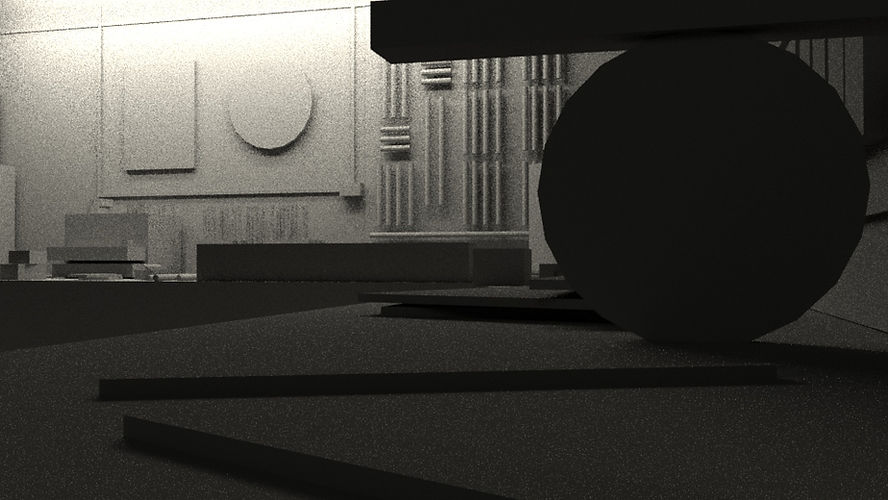
Here are a couple of lighting situations I played with, it was mainly different light temperatures. I kept thinking that it was too dark, but a basement would not necessarily have this big bright lighting situation. I also tried some hero shots. I wasn't so worried about how noisy the renders ended up because I'm still in the testing phase.


I ended up liking this and ran with it.

Update 1/13/2021:
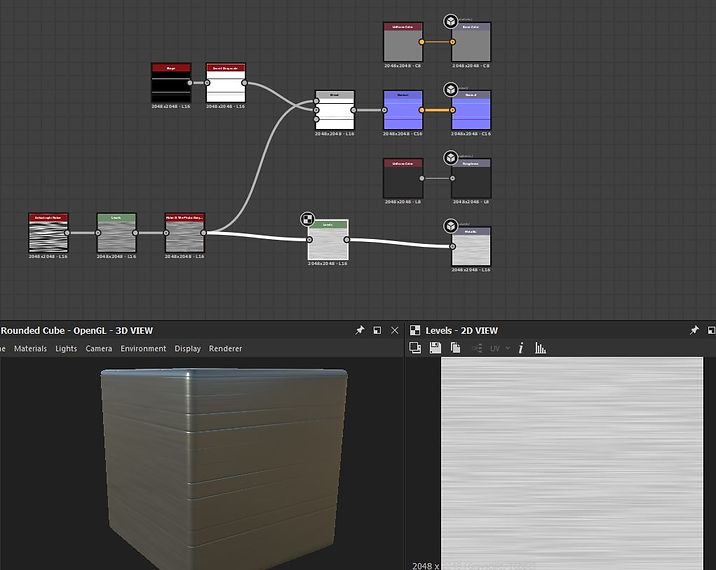
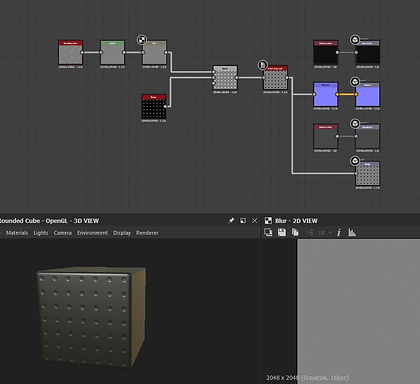
Over the past few days, I've been working on a few procedural textures: a pegboard and some rusty painted metal. I ran into problems with both of these and they're far from done. I did these renders in Arnold which is the render engine I plan on using.
I ran into a weird issue with the sphere texture where I think that the normals are facing the wrong direction (I'm not super sure what happened exactly though). I'm probably going to completely remake the texture in Maya's hypershade to make sure the issue isn't with the texture itself. Below is how I built the shader in Substance Designer. I am still not 100% happy with the results.

The rusty painted metal shader I had a little more luck in but looking at it now, I think I got a little too carried away with it. I think the parts where the paint used to look more like it was rusted off instead of flaking off like I initially planned. The next step would be making custom alpha mattes in photoshop to create that flaked-off paint look that I wanted.

Just for fun I threw the pegboard texture into my blocked out seen.

Update 1/19/2021:
This time around, I sort of did a little of everything. First, I was not super satisfied with how the paint texture looked so I revised it. The first version I thought looked a little too rusty and more like the paint was being eaten by rust instead of the paint flaking or scratched off. I think I'm going to save the paint layer and the rusted metal layer and bring them into Substance Painter and apply a grunge mask there. While the textures right now are not completely tileable, it's a solid start.
I had the unexpected pleasure of working with the photogrammetry artist Kiana Smith, and they have scanned some objects for me! I've done a little bit of poly reducing for the scans of the hammer and toolbox. The steps usually go like this: import, freeze transformations, mesh cleanup, quadrangulate, and poly reduce as many times as necessary. I plan on meeting with Kiana a little more to help create a plan to fill in the missing spaces for these objects. I've worked mainly with the hammer, but the mesh I'm a little worried about is the shop vacuum. It's an extremely complex object and needs some work.


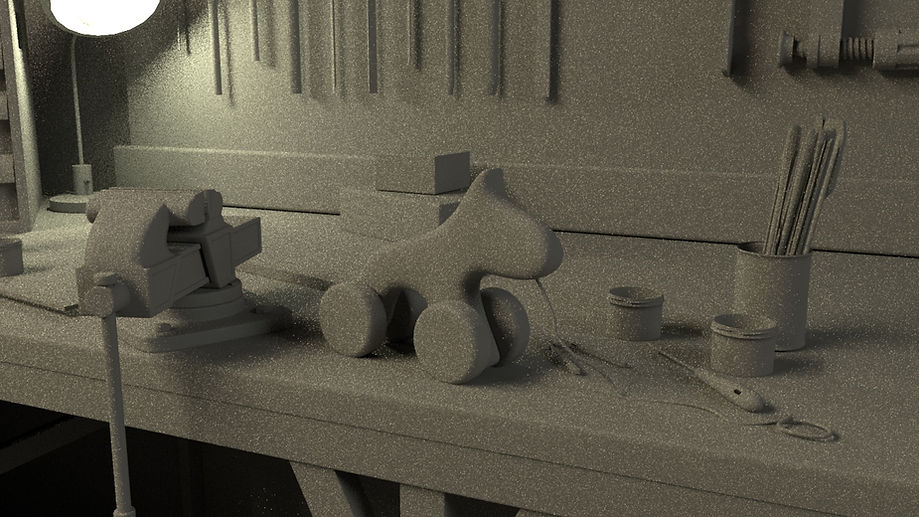
The most exciting part of this update was putting some models into the scene! A majority of the models were found of CGTrader.


I found this little toy horse model and fell in love.
Update 1/22/2021:
I've added a handful more models to the scene, such as a bench vice, drill press, and a hacksaw. I also worked on refining the hero shots which I feel like works a lot better.


Update 1/25/2021:
This time around I was focusing a little more on replacing the placeholders with actual models. I added things like tape rolls, some lathe tools, and a hand sander. I hope to get the lathe in the scene soon. I'm thinking about modeling a gooseneck lamp and adding that to where the wooden horse toy is. I also used the make-shift hero shots to see which lighting scenario I liked more.


This shot in particular with the drill press makes me want to play more with different temperatures of lighting.


Update 1/27/2021:
I almost have all the models in the scene that I want and I would like to say a huge thanks to Roman Davie for modeling this lathe for me! I also worked on getting the desk to look more desk-like in addition to a camera move for one of my hero shots.
Update 2/1/2021:
At this point, I basically removed all the placeholder geometry with the actual models and I'm more or less ready to start with poly-reducing, deleting unseen faces, and preparing the uvs. Over the weekend, I worked on some modeling, making the took boxes and organizers.

Here are the updated hero shots!


I don't consider myself the best at modeling, but here a couple of renders of the toolbox, organizer, and shelf that I made.


Update 2/3/2021:
I worked on the camera moves for the four hero shots! Right now they're just playblasts.
Update 2/8/2021:
I've been focusing on deleting unseen faces as the beginning of my uving process. While the scene doesn't look that different, I deleted over two hundred thousand polygons. I still have a ways to go but this optimization will help reduce my render time and make the overall uving process much easier.


Update 2/10/2021:
The past couple of days have been more deleting faces. I'm going to start uving over the weekend.

Update 2/15/2021:
Optimizing the scene is complete! Moving forward through the week and into the weekend I'm planning on getting the uvs done.

Update 2/17/2021:
This is the beginning of the long, tedious work of setting up the uvs. Admittedly, this is taking me much longer than I anticipated but it's not hard work (but when you put on an audiobook it makes the time pass a little faster). Some of the objects I came across still had some faces I could delete which is where some of the time-consuming bits came from. I have multiples of some objects here, like random boxes or a bunch of plastic jars, I only showed one here but I ended up copying the object and replacing the multiples.


Update 2/22/2021:
This weekend has been full of uvs and they're taking much longer than anticipated. I'm slowly working my way around the desk and I got stuck on the lathe. I realize after almost four hours that there was an easier way to format the uvs, but I ended up trying to fix all the original edges instead of projecting from an axis like I usually do. I don't know why I ended up doing this, it kind of just happened that way. But anyways, here's the next batch of uvs. I hope that by the next weekend they'll be done, I'm more concerned that they are done well and organized instead of rushing into putting textures on and needing to redo them as I go.


Update 3/1/2021:
I'm still in the midst of uvs but the good news is that it's almost done! I have a handful of objects that need to be taken care of (this lathe is still giving me some agita but it's also almost done). At this rate, all the uvs should be done a week from today.


Update 3/8/2021:
I finally see the light at the end of the uving tunnel and I couldn't be happier! The only object that's giving me some trouble is the clamps. On the top part with the teeth has a shared edge somewhere that I can't find yet, but as soon as I figure that out I'll be golden. Otherwise, all the uvs are DONE! I feel like I need to have a little celebration.


Here's what the uvs for the clamps look like so far, they're still in the messy phase though.

Update 3/10/2021:
I did a little playing around with the camera moves and lighting with the grids assigned to the entire scene. I have to admit, seeing the workshop like this is getting me so excited to see what everything looks like when the real textures are on it!
Update 3/24/2021:
It was really refreshing to take a week away from the workshop after working on all of the uvs! I threw in a couple of the textures I worked on a while ago and they look so much better than I thought they would. I went to go bring the stool into Painter, but there was something funky going on with the uvs that prevented me from using udims. Moving forward, I'm going to work a little bit more in Designer to get some of the more simple textures done first so I can spend some more time on materials that need branding. Here I have some of the updated Designer files that I messed with over the past couple of days. I want to change the wood planks on the bench to have some more variation (I'm thinking about using a tile generator). I also plan to do some fun painting for the little horse toy over the weekend.


I also couldn't help myself and I needed to know what these textures look like with the lighting! I still need to do a little bit of trouble shooting with the plastic jars, they're not as translucent as I want them to be.


Update 3/29/2021:
This weekend admittedly didn't go as smoothly as I thought it would. Part of that has to do with my inexperience of the udim workflow in Arnold, and the other being that I had a difficult time finding information on Arnold's udim workflow. So far, I have brought some of the smaller objects into Substance Painter -it might be that there are two different udim options that I could use and that affects how Arnold reads it. I ended up going with the option that let me paint across different texture sets, the other option doesn't do that. Either way, I need to do some more troubleshooting. For now, all of the texture sets have their own shader; and at the end of the day, I'm happy as long as the textures are there.
Here is what I found in order to use udims per file input for the shader. There are several different ways to do this, and because all the images I had from the texture set were different files, I used the explicit tile setting for my tiling mode. This I think is the area where I need to do a little more research on.

I revisited Substance Designer to bang out this really simple ridged metal handle for both of the toolboxes.
And because branding is also important, I threw together this cute little logo totally not inspired by one of my dogs. Also a picture for inspiration.... because I think it's necessary.

I have to admit, overall, I'm really happy with the direction I'm going in. While I am having problems, it's really encouraging to see how my textures are looking so far and I'm so excited to work on the more complicated objects. I have to go back and fix the wood base on the chisels though, but that might be on the back burner for a bit.


Update 3/31/2021:
I managed to fix my issues with the udims; it turned out that for some of those materials I had the wrong export settings in substance painter and that lead to an incorrect naming convention. Now that I know what's going on, I went back and fixed all of the materials that used uidms. Instead of using explicit tiles for the uv tiling mode, I'm using the udim mode. Another really quick visit back into Designer to edit my table texture but after throwing it in Maya I see that I need to go back and make it tilable.


Here are the updated renders! I also want to add some ambient occlusion to the table to add some more depth to the spacing of the wood slats.


Moving forward to the weekend, I want to start focusing more on the objects on the wall, like the clock and calendar, and a lot of the tiny stuff on the desk. I also want to add little pegs into the pegboard.
Update 4/5/2021:
I am not super happy with my progress this weekend. Part of that is because I was putting more of my energy towards a different project, but also when it really came down to making the textures I did not think they turned out well. I started with making a new wood grain to do one of two things: get a kind of wood in the scene (I was going for poplar) and to add some color. While I think it looked decent in Designer, I really didn't like how it looked in the scene. I had an extremely difficult time trying to get the clock looking the way I wanted and ended up scrapping everything. I worked on getting the bench vise and tape rolls textured and I think they're alright, but could be better. Here are the Designer textures I worked on over the weekend.


There's something off about how the organizer looks on the desk and I can't quite put my finger on why. Maybe it's the way that the lighting looks. While I did work on adding things to the scene I'm not really happy with it. Either way, I'm trying to not let this little rough patch get me too frustrated and I'm going to move onto something else for now.


Update 4/12/2021:
This past weekend had less progress in new textures, but I went back and revisited the textures from last week that I was not so happy with. I completely redid the table textures; I made it 100% tileable in Designer and went back and redid all of the grudges. I also redid the grunge for the organizer. I'm still not super into what the outcome is but it's a lot better than it was before. I also went into photoshop this weekend and made a really quick image for the calendar.


There's something weird happening with the table right now and I don't know exactly why it's happening. I'm going to try deleting the history and see if that works. It also looks like the normal map is inverted now that I look at it.

Here's what I did for the calendar in photoshop! I honestly have a better appreciation for how they're designed because I had an interesting time looking for references. I don't know if this is going to be the image I go with, it's just a cool picture of some giant rose quartz I took when I was in Europe and thought it looked cool. I used the same method of making the clock face. The next step really is to take this as a texture into Painter and project it onto the geometry.


For the next couple of days, I want to get started on the lathe and other tools on the desk.
Update 4/14/2021:
I worked on a couple of things yesterday when it comes to logos and Designer textures. I started by making the logos I wanted to put on the pencils and the handsaw - both may or may not have been inspired by more dogs. The pencil logo was just a matter of finding a font that I liked, and the handsaw logo I drew the antlers. For making the textures in Designer, both are basically the same, but one has paint blended into it and the other doesn't.


Right now for the handsaws, I don't think the placement for the logo is final and needs to be moved up more. I also plan on adding some more text on the blade, I need to do a little more research on what that text is going to be. For right now, I'm leaving some of the aging/wear and tear out of this initial pass in order to get all of the basic textures done first.


Over the weekend I want to get the lathe textured and work on some texture turntables of what I have so far.
Update 4/18/2021:
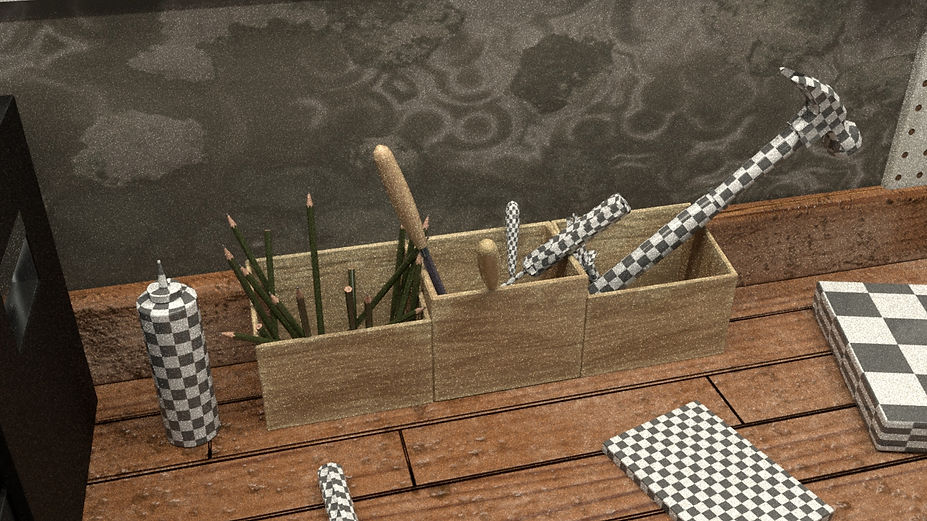
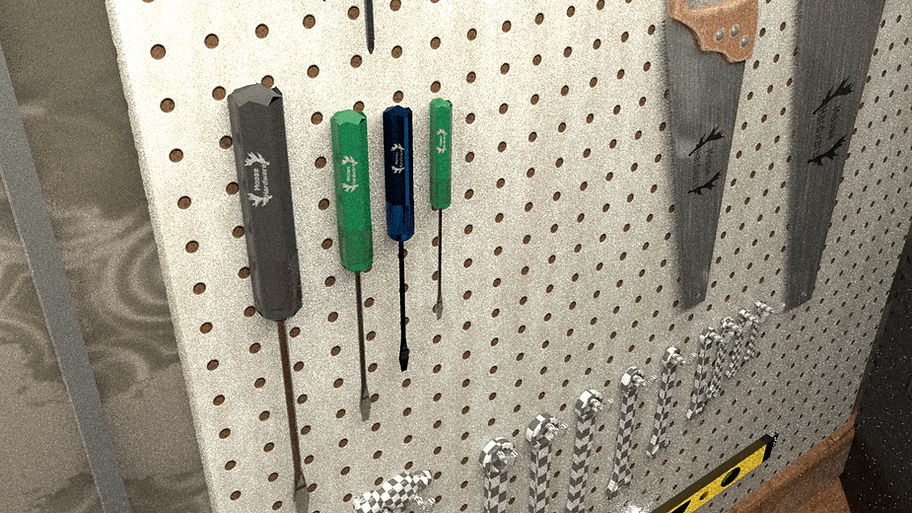
This weekend I think I made some good progress on the workshop. The goal really was to get the tools in the organizer and the wall somewhat done and work on the lathe. To start I made a simple, customizable rubber texture for objects like hammers and screwdrivers. I made two variations of this, one with the little holes and a more intense blue noise pattern, and one with a less intense blue noise pattern without the holes. Similar to the pencil texture from last week, this was just a matter of rearranging the node network a little. I also made a simple rough-looking metal texture. I'm basically making base materials that I can apply to a bunch of different objects.

Here's what the tools look like so far.


I also got most of the lathe textured as well! I brought in some text from photoshop as well; for the warning label, I translated it into German to make it generally less distracting. I realized not too soon after starting the lathe that I had some polys missing, which really isn't a huge issue. They probably got a little lost because I had to reformat the uvs, in the end there were nine texture sets for the udim.


So far I think I'm happy with the lathe, I still think that there's a lot of work to do on it but for now I want to keep chugging forward. I'm going to make some material turn arounds over the next couple of days and hopefully knock out the rest of the objects on the left side of the desk.
Update 4/21/2021:
Something I thought would be relatively easy turned out to be one of the most time-consuming things yesterday. I started to render my material breakdowns, but I ran into a bunch of issues. I had to remake materials because they were procedurally done, but the thing that got me was that the renderfarm wasn't reading the majority of the files that I tried to use. I only was able to throw one of four shots onto the far. Out of the four shots, only two ended up getting fully rendered and I've never been more frustrated with this project. I'm not super proud of what I have to show for today, but something is better than nothing and I have to keep moving forward. When those other shots get rendered, I plan to show those updates. Also huge thanks to Matt Gargiullo for writing music for me again!
Update 4/26/2021:
This past weekend I worked on getting the last two renders for the material breakdowns but realized afterward that there need to be some edits. I also went back into Designer to work on a peeling paint on wood texture and finished off the tools on the left pegboard. I am still running into issues with the renderfarm, but I think I might run a couple of render tests over the next few days to make sure things are working the way they need to. Ideally, this week I want to get to work on the tools on the right pegboard. For now though, here's the updated WIP for the turn arounds.
I feel like the render in the scene doesn't do the material justice, so here's what it also looks like in Painter.


I still have to figure out how procedural I want to make this peeling wood paint material, I also don't know if I'm going to build off of it or not. It was fun to work on a little bit of a more complicated material!

Update 4/28/2021:
While this doesn't look like a lot for an update, I've been working on a few things over the past day or two. I revisited the wood texture from the other day and I'm going through converting certain inputs into parameters so it's more customizable when I eventually use it in Painter. I finished texturing the calendar with some little bits of writing as well as a test render of shot 4 on the renderfarm (I had to throw it on the farm three times, the first time I forgot to connect some textures, the second didn't return any of my frames, then there were 13 jobs ahead of mine and that number didn't mine and that number didn't move for a couple of hours). I think the image on the calendar is a little too realistic for what the textures look like, so I'm going to revisit that in photoshop. My goal over the weekend is to have everything in shot 4 textures as well as getting more of the objects on the right side of the desk textured.


While this cut of shot 4 isn't perfect (with some -kind of important- textures missing), I wanted to call it a night so here's the WIP so far. There are some floaty and see-through objects which I'm also going to fix over the weekend.
Update 5/3/2021:
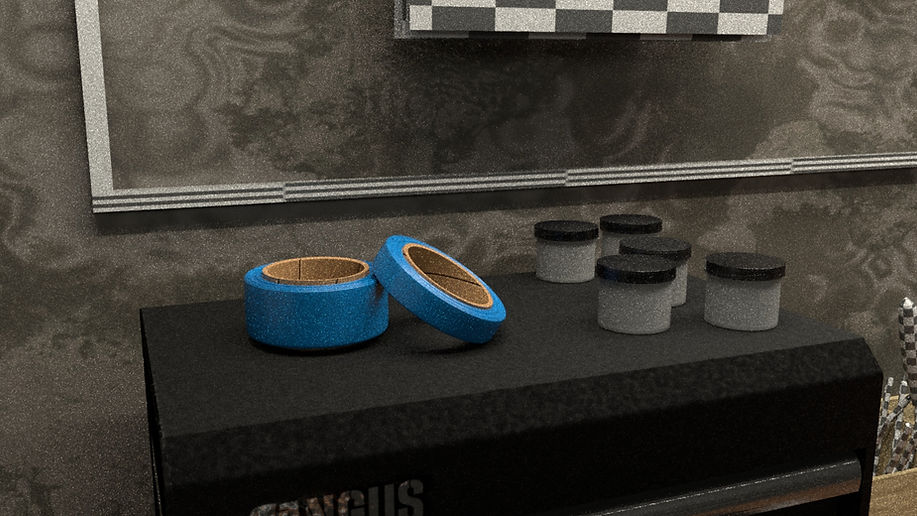
This weekend was devoted to changing all my file paths to relative paths for both my render file and main project file. I have almost everything textured in both shots 2 and 4, the main things left are all these little boxes of things. Logos and labels honestly take me more time than I originally thought (I am by no means a great graphic designer). I fixed the texture for the giant cabinet but unfortunately the lighting for the render that I have looked a little weird.


Unfortunately there was some weird warping happening with the glue bottle label but I don't think I'm super mad at the results. As for the updated WIP for shot 4, there are still some textures that I have to go back and reconnect, but it's a little easy to miss one or two textures when there's over 30 in hyper shade.
Update 5/5/2021:
The past few days escaped me and I was more preoccupied with another project. While I do not have a lot to show today, I went back to reconnect the missing textures in the shot 4 WIP (the render farm was still not my friend), in addition to finding and working with a lighter. I also started working on one of the variations for the nail box labels. I want to make a couple of simple line drawings so it's not just painted text.

Update 5/10/2021:
I'm really excited to say that I managed to get all the textures done for shots 2 and 4! There's something weird happening with the normals on the toy horse's back wheels which need to be fixed. Here's what the shots look like now!
I hope to get some lighting tests back from my lighter soon in addition to getting some of the tools on the back wall over the next couple of days. I have a feeling that rendering is going to take a really long time.
Update 5/12/2021:
I got the first lighting pass from my lovely friend, Shelley Friel, and I think they look great so far (much better than what I had that's for sure). I'll get the scene back in a day or two and start my final renders for shots 2 and 4.


Update 5/17/2021:
This weekend has been about getting the final renders of shots 2 and 4, (shot 2 was rendering on the farm at the time of writing this) and getting the drill press textured. I don't have very much left at all for textures. The next thing to finish is the textures for shot 1 which will probably be done before the weekend, give or take the radio. I only need to do the radio, sander, and hand plane which don't seem too difficult to work on.


I got back the render for shot 2 early in the morning and I'm glad I managed to fix the issue with the back wheel normals.
Update 5/19/2021:
I got all of the textures for shot 1 done and sent off to the farm at the time of writing this. I ran into a bit of a snag when two of my objects for some weird reason didn't have their uvs, and for the sake of time I ended up deleting them. There are only three more textures I need to make before everything is completed and ready for final renders!


Unfortunately when I got shot 1 back from the farm I had a few textures missing.
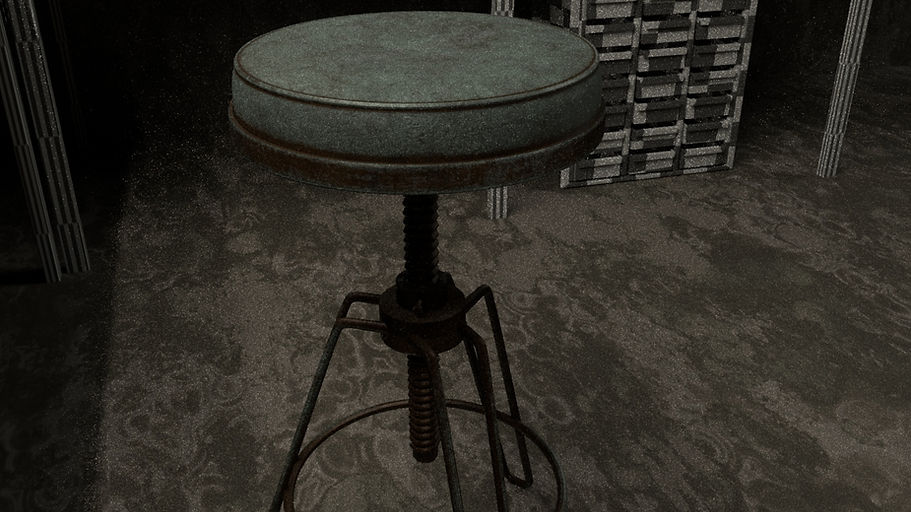
Update 5/24/2021:
Oh man, I finally have all the textures where they should be! There are still some weird things happening with the render farm, but I've submitted upwards of 20 jobs with revisions for shots 1 and 3 and in all of them refused to render the stool. In the last render test, there were some paranoid activities with a ghost stool and I have no idea how to fix it. I've done things like remaking the shader and deleting the mesh and replacing it. Anyways, here's my progress!


